
Hello everyone! On Monday when I shared our DIY bed in this post, I promised that I would share how I made the toddler bed rails. Guess what today’s post is about? 🙂
I wanted the bed rails to serve two purposes. Obviously the first being safety, but the second is a sense of security for Tristan. Since we were moving from the crib straight to a twin, I wanted to make the transition as easy as possible on him. I knew that some chunky bed rails on both sides would help it feel more cozy and crib like.
I looked into the plastic/mesh ones they sell at the store, but at $20 or more a piece I decided that I could make my own AND make them prettier!
I purchased four 8 feet 1x4s and made the following cuts for our standard twin sized bed:
- 4 @ 20″ (vertical posts–our mattress height is 9″)
- 4 @ 48″ (rails)
- 2 @ 40″ (connectors under mattress)

I just used furring strips since they are cheap so my grand total for lumber was $9. Not bad 🙂
The hubby is still trying to train me on the drill, so he did most of the assembling. He began by drilling 2 holes near the bottom of the 20″ posts with his countersinking bit.

He then measured up where those holes would meet the 40″ connector piece and drilled pilot holes. Then he attached the two pieces together with wood screws.


Since he countersunk the screws I was able to go back around and fill them all with wood putty.
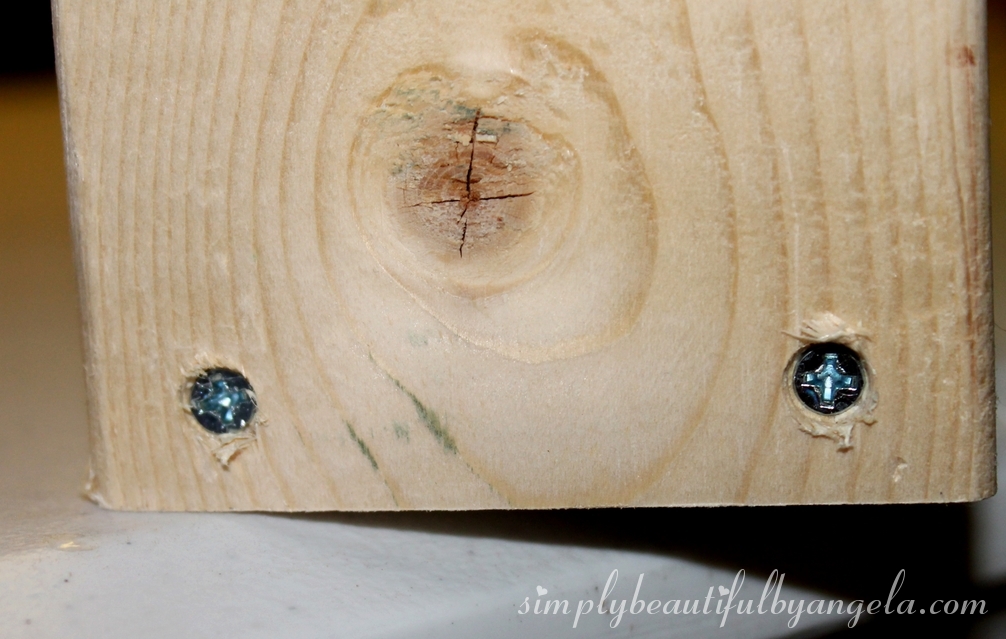
He also attached an L bracket to make them more secure. Side note–make sure you get some big sturdy L brackets!! Ours are kind of flimsy and I think we may need to replace them down the road.

After those were finished, we connected the two “U” shapes by attaching the 48″ rails to the posts spaced 3.5 inches apart, again countersinking the screws and filling them with wood putty.

After they were assembled I sanded, sanded and sanded some more to get rid of any rough edges. Then I applied one coat of primer, two coats of paint and a coat of polycrylic.
This is how they turned out!


Like I said, they are a little flimsy because of the puny L brackets that I purchased but so far it’s been a month and they’ve held up.
The 48″ length is perfect because it only leaves a small space at the bottom of the bed, just big enough for him to climb up. I think it reminds him of his crib and is probably what made the transition so easy (besides his excitement over his super cool bedding!)

This little 2 year old is pretty happy with his new sleeping quarters now 🙂
I hope everyone has a great day, we’re getting poured on here but I am honestly loving it since we haven’t seen rain in awhile!
Linking up to these awesome parties!

This post was featured on Be Inspired by Elizabeth & Co! Click on the image below to take you to the feature post.
|

Love those dino feet at the top of the step stool. What a fun bedroom!
Thank you Audra, I really appreciate it! I had a lot of fun decorating it 🙂
I love everything about this room, so bright and happy! And the bed is an awesome project. Featured at Be Inspired this morning. Thanks so much for sharing!
Thank you so much Sharon! That made my morning 🙂
Where did you get his bed set?
I purchased it at Target but unfortunately they no longer carry it. They have a couple other cute sets though that may be worth checking out!
Did you ever experience something like you want to travel but cannot do that due to the worry about where and how your baby will sleep while traveling? This is the common problem for the parents who have infants or rising toddlers. Just for this reason, most of the parents completely change their lifestyle and stop traveling outside when they’re blessed with children. But, this is not an expected incident for anybody. Instead, they deserve to enjoy every moment of their time with the newborn babies or toddlers. Taking help from a portable bed like Regalo My Cot Portable Toddler Bed can be a brilliant solution in this regard.
Transform your Bedroom into a Romantic Retreat Silk Bed Skirts
Thanks for sharing nice information with us. i like your post and all you share with us is uptodate and quite informative, i would like to bookmark the page so i can come here again to read you, as you have done a wonderful job. mulberry silk bedding