Simply Beautiful By Angela

creating simple beauty on a budget

  • Home Tours
  • Projects
  • Legal
  • Link Parties
  • Let’s Chat!
  • About Me

Shiplap in the Bathroom

April 13, 2016

 
Happy Wednesday everyone! Thank you all for the sweet comments on the Bathroom Makeover post that I shared last week, they truly warmed my heart! 
 
Today I am going to share my favorite part of the bathroom–the shiplap!
 
I actually came up with this idea by total accident.  I saw a picture of a bathroom similar to this one, and at first glance I thought it was shiplap.  After looking closer though, I realized that it was actually tile.
 
(source)
 
That’s when my wheels starting turning and I thought, “wow a half wall of shiplap would actually look great!” My crazy imagination has some good ideas every now and then!
 
Supplies Used: (Affiliate links may be provided for convenience.  For more info, see my full disclosure here.) 
  • V-groove planks (If you don’t have a Lowes near you they can also be purchased on Amazon here)
  • Measuring Tape
  • Level
  • Pencil
  • Stud Finder
  • Finishing nails
  • Hammer
  • Jig Saw
  • Minwax Wood Filler
  • Paint roller
  • Paint brush
  • Satin paint
  • White Caulk
I liked that it would be a super affordable way to add some character to the room.  I only needed three packs of V-groove planks which are a little over $9 at Lowes.
 
(source)
 
 They recommend taking the planks out of the packaging and letting them acclimate in the room for at least 48 hours.  I’ll be totally honest with you, I only waited 24 hours because I was too impatient.
 
I started with the bottom plank and worked my way up. At this point I had planned on installing wood laminate plank flooring, so I left a gap about the same thickness of the new flooring. More on that in a minute though, things don’t always go as planned!
 

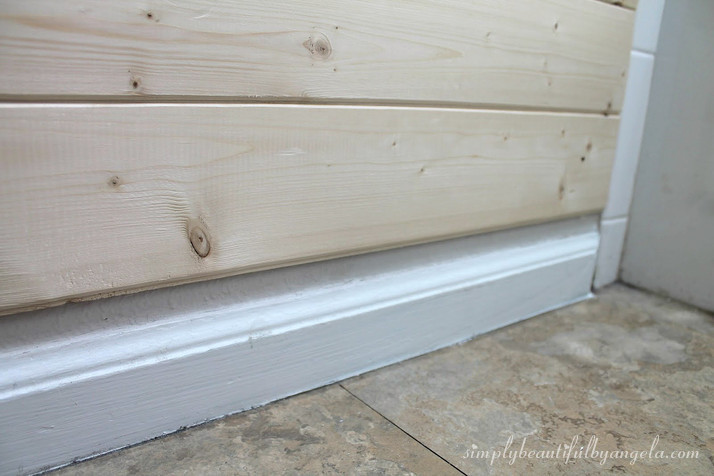
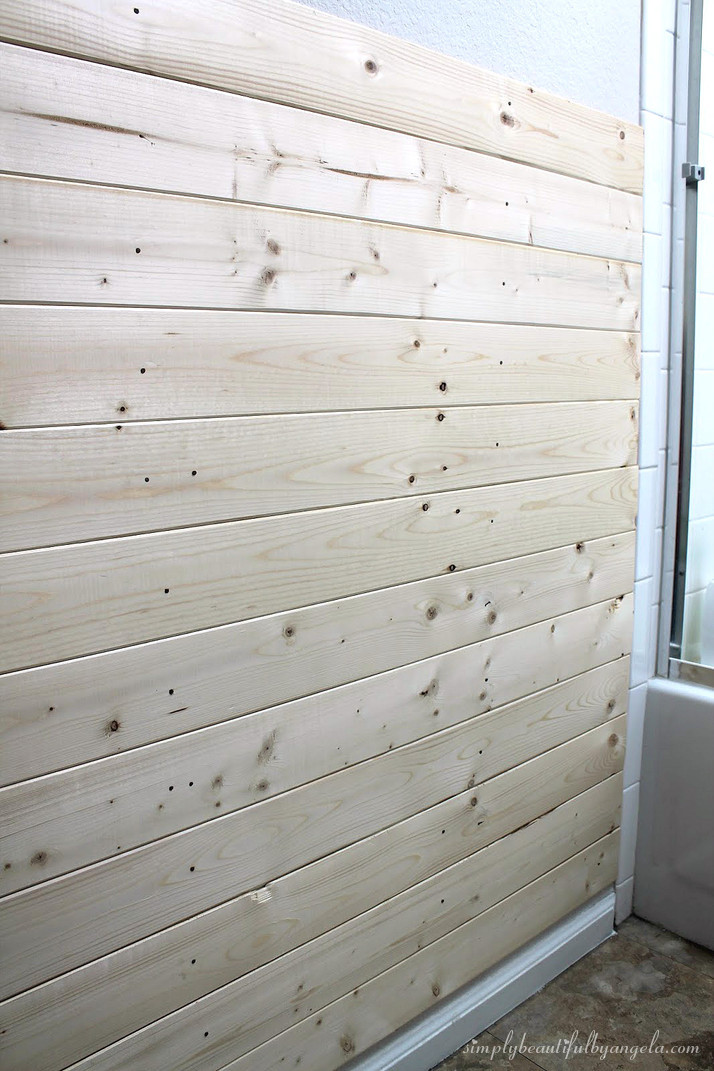
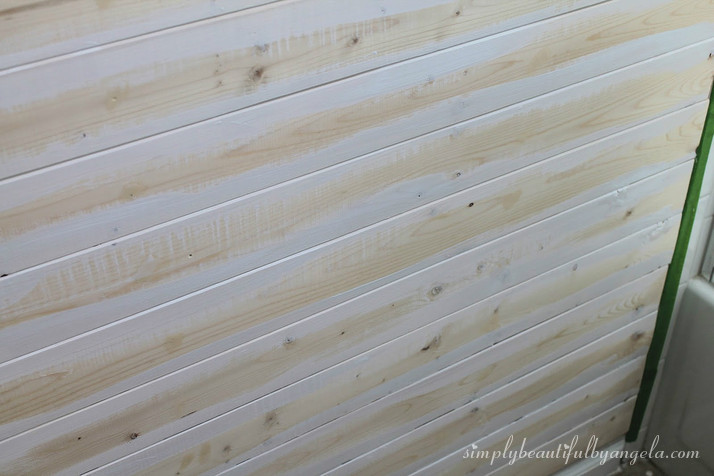
I used a level to make sure that the first plank was straight. I don’t have a nail gun so I just used finishing nails and a hammer to attach the planks to the studs.  I then used a large screw to tap the nail heads in so that I could cover them up with wood putty.

Working behind the toilet actually wasn’t as tricky as I had anticipated.  I just slid them down from the top and when I got to the wall connection I just cut two smaller pieces so that there was one on either side of it.  I could have done circular cuts with a jigsaw but who really looks back there anyways, right?

 
The only areas I actually used a jigsaw for were the spot around the vanity and the light switches. 
 
It’s pretty easy, you can either use a measuring tape and draw it out or you can just hold the plank up and make marks where the cuts need to be made.
 
Notice that we pulled the outlets out a little bit so that they could sit on top of the plank.  That way, when the outlet covers go back on it sits nicely on top.

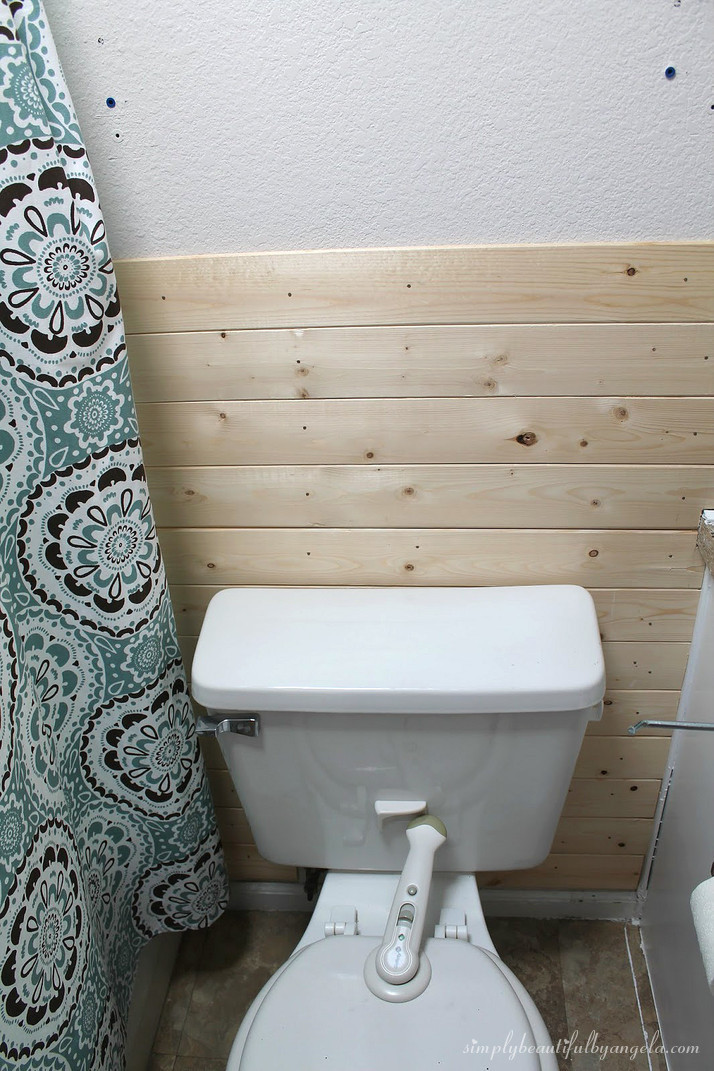
Once all of my nail holes were filled and sanded it was priming time!  I started by using a brush over each seam, then used a small foam roller over the entire thing.

 
After the primer I applied two coats of paint.  I decided that I hated how the flat paint looked so I ended up going over it one more time with a satin finish and I love how it turned out!
 
 
I added a piece of 1×3 MDF to the top to finish it off. 
 
 
It was kind of a pain to paint behind the toilet so I only got as far back as I could reach with the brush, but since that’s all that’s visible it didn’t matter.
 
 
Okay I have to seriously laugh at myself here for a minute.  When I did the shiplap wall in the dining room, anytime I saw a small gap between the planks my “amazing” solution was to smush a ton of paint in there.  Yep. That really happened.  Then weeks later the paint all cracked and I was back where I started.
 
 
If you happen to stumble across that post try not to laugh!  I was such a newbie haha…
 
This time I went over each seam with a line of caulk.  I smoothed it out with my finger then ran over it with a damp rag to wipe any excess off.  It would be tedious on a large space but for this small bathroom it actually didn’t take much time at all.
 
What a difference!
 
 
So my original plan of wood laminate plank flooring was nixed when I started reading about people having trouble with them warping in bathrooms due to the moisture.  I ended up going with a vinyl peel and stick which actually turned out even more awesome than I thought it would (tutorial here).  However, because it didn’t cover up that gap that I had left for the plank flooring I had to purchase some thick baseboards to cover the gap up.
 
It kind of bothers me that the bottom plank is skinner than the rest, but hopefully it’s not too noticeable to someone who isn’t looking for it. 

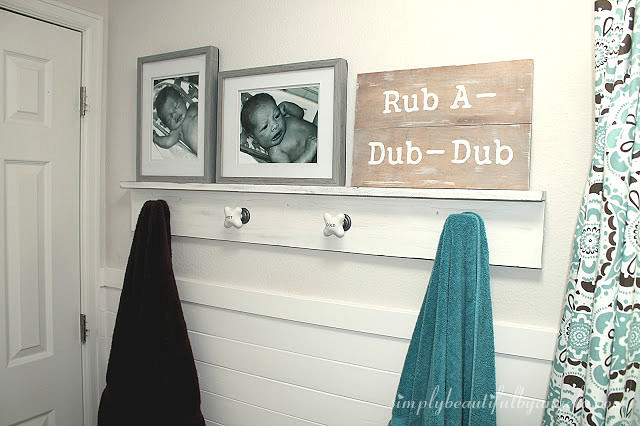
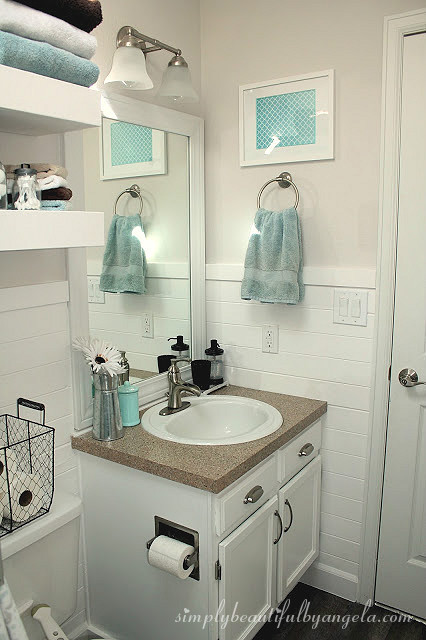
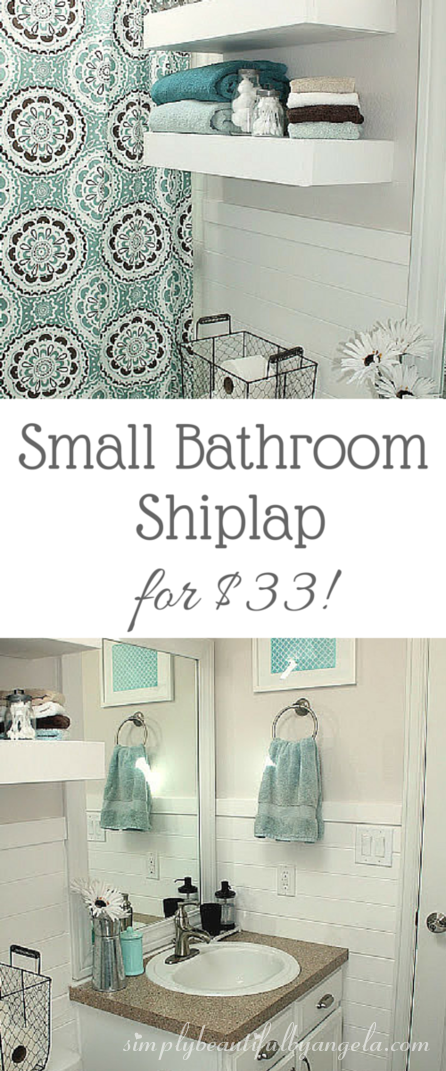
I’m definitely loving the farmhouse feel that it adds to the bathroom and it’s amazing how much brighter it is now! 

Linking up to these awesome parties!

Β· Labels: Uncategorized

Comments

  1. Wilma Hovius says

    May 4, 2016 at 8:08 pm

    Hi! I totally want to do this in my bathroom–you make it seem so do-able πŸ™‚

    One question: how wide are the planks you used?

    Thanks!

    • Angela says

      May 4, 2016 at 10:29 pm

      Thank you so much Wimla! I used the packaged planks by Evertrue sold at Lowes I believe they are about 3.5" πŸ™‚

  2. Kara Doll says

    October 19, 2016 at 2:17 pm

    Do you have any problems with the shiplap warping? I also have a small bathroom not alot of circulation, and I have an area above my shower (because it doesn't go to the top of the ceiling) that needs done.

  3. Angela says

    October 19, 2016 at 2:28 pm

    No it's been more than 6 months and no issues so far! If it is going near the shower I would just use a semi gloss paint to protect it a little better. You could even look into putting something on the wood prior to protect it πŸ™‚

  4. Andrew Finch says

    January 12, 2017 at 1:05 pm

    Oh Jisus! Your bathroom is just too good. It's better you have shiplap, not just it will give a better look but also will protect the wall from damage. Few people thought it as a wastage of money but once you have it you can feel the difference. Thanks for sharing the photos. There are lots you need to do to make your bathroom good so that you can spend some peaceful time in that. Everything should be well managed. We had made the complete renovation of our bathroom last month with guidance of bathroom renovation San Marcos, CA. It was on budget and our bathroom is the coolest.

  5. Unknown says

    February 10, 2017 at 7:19 pm

    It looks so beautiful and clean. Is the shiplap easy to clean behind the toilet? I have 2 boys too (much older than yours) and their aim is not always the best… :0 so I want to make sure that it is super easy to clean.

  6. Angela says

    February 10, 2017 at 9:07 pm

    Thank you! Yes I would think you could easily attach your cleaning rag to a pole or mop and reach back there πŸ™‚

  7. Lindsey @dmv construction says

    February 15, 2017 at 5:38 am

    I am a regular reader of your blog. As a profession I am a roofer but this post attracts me. This is really a great idea. I'll definitely try to make this at my home.

  8. Brooke House Of Usher Wax says

    March 2, 2017 at 6:08 am

    I love this look. Also where did you get the shower curtain? I love it.

  9. Angela says

    March 3, 2017 at 2:15 pm

    Thank you very much! I got it at Target πŸ™‚

  10. Eric Davey says

    March 15, 2017 at 10:51 am

    Before constructing a house, we should first choose the best flooring and home decor option. So that we can easily attract people and their attention towards our home. Home decor includes home interior decoration such as; living room decoration, kitchen and bathroom decoration, and many others. Here in this article also, we can get some quick review on bathroom decoration and flooring, I would like to follow the instructions present here regarding home decorations.
    Vinyl Windows Thousand Oaks

  11. Kathreen Miller says

    April 13, 2017 at 11:15 am

    Great tips I too wanted to renovate my washroom this post really helped a lot. Thanks for sharing such an amazing information.
    dmv construction πŸ™‚

  12. content writing says

    December 10, 2017 at 1:45 pm

    I really liked the design of the bathroom that you showed, the combination of colors looks very laconic in the room.

  13. resume-service.org says

    January 11, 2018 at 12:06 pm

    I want to notice that your cleaning has benefited this room, because now it looks simply flawless and incredibly stylish.

  14. Angel Sims says

    January 12, 2018 at 4:02 pm

    Did you go all the way around the bathroom with the shiplap or just behind the toilet and around the sink?

    • Angela says

      January 12, 2018 at 9:30 pm

      I did go all the way around!

  15. Anonymous says

    March 29, 2018 at 5:31 pm

    how high up do you go with the shiplap

    • Angela says

      March 29, 2018 at 7:47 pm

      I went high enough so that the top board would go above the light switch–so 48" πŸ™‚

  16. mimicoco says

    June 21, 2018 at 11:25 am

    Hey, Wow all the posts are very informative for the people who visit this site. Good work! We also have a Website. Please feel free to visit our site. Thank you for sharing.
    Bathroom Accessories
    Keep Posting:)

  17. Linda Mason says

    July 23, 2018 at 4:11 pm

    wire can demonstrate that safe hair removal empty cleaner isn't that hard, nor expensive green gobbler review

  18. cara menggugurkan hamil says

    August 11, 2018 at 7:06 am

    kandungan dengan cepat dan akurat terbukti ampuh untuk melunturkan janin kehamilan muda 1 minggu hingga 1 , 2 , 3 dan 4 bulan
    obat penggugur kandungan adalah suatu bentuk proses berakhirnya kehamilan dengan dikeluarkannya janin ( fetus ) atau embrio sebelum memiliki kemampuan untuk berkembang dan bertahan hidup diluar rahim , sehingga bisa menyebabkan kematiannya pada janin
    Disini akan kami beritahukan kepada Anda langkah cara cepat menggugurkan kandungan dengan cepat dan selamat adalah KURET dan obat aborsi
    Kunyit memang tidak di baik di konsumsi oleh ibu hamil yang sedang hamil muda sehubungan dengan sifatnya untuk melancarkan haid , dan di percayai sebagai obat telat datang bulan
    jual obat aborsi paling manjur Misiprostol Cytotec asli terbukti ampuh melunturkan janin kuat tanpa kuret dengan bersih untuk usia 1 , 2 , 3 sampai 4 bulan dengan aman
    cara mencegah kehamilan Cara Mencegah Kehamilan saat berhubungan suami istri perlu perencanaan
    cara menggugurkan hamil

Hello, I am so happy that you're here! My name is Angela and I love to create simple beauty in our home on a budget. Here you will find DIY decor and home projects, furniture flips and other home inspiration!

Never Miss a Post!


Diagonally Fluted Nightstands

Diagonally Fluted Nightstands

Hello! I’m really enjoying the extra daylight and the fact that it’s been paired with warm sunny weather this week has been icing on the cake. I’m trying to soak it all in before the next snowstorm! Today’s flip was from about a year ago and is still one of my favorite sets of nightstands…

Read More »

How to Update a Dresser with a Missing Drawer

How to Update a Dresser with a Missing Drawer

Hey friends, happy March! Even though I know we still have quite a bit of cold weather coming our way here in Colorado, it’s exciting to see these warmer days sprinkled in here and there. This week I am sharing how I saved an old IKEA dresser from ending up at the landfill! Supplies Used:(Affiliate…

Read More »

Vintage Ice Box Style Nightstands Makeover

Vintage Ice Box Style Nightstands Makeover

Hello friends! We just got back from our annual trip to the Great Wolf Lodge and it was fun times as always! Today I am sharing how I updated these fun vintage ice box style nightstands that I found on Marketplace! Supplies Used:(Affiliate links may be provided for convenience.  For more info, see my full disclosure here.) …

Read More »

Never Miss a Post!


GOOGLE 2

GOOGLE 3

GOOGLE 4

GOOGLE 5

GOOGLE 6

GOOGLE 7

Theme by 17th Avenue · Powered by WordPress & Genesis